Website relaunches usually fail in ordinary places: one missing redirect, one wrong canonical, one form that looks fine but never delivers. The fix is not panic. It is order.
When a site owner prepares to go live, the questions are usually practical: What must be backed up first? Which URLs cannot move? What should be tested before DNS or traffic changes? How do you protect search visibility while still fixing the site? Tim Berners-Lee put it plainly: “Cool URIs don’t change.” That principle still matters because launch risk rises quickly when stable paths are treated as optional.
For broader planning context, teams can compare guidance from Google Search Central before choosing a workflow.
This article walks through a step-by-step launch checklist for WordPress sites that are being restored, migrated, or relaunched. The goal is to keep the baseline steady: URLs stay predictable, redirects are intentional, technical SEO signals remain clean, and the recovery path is tested before you touch production.
Why this kind of relaunch breaks SEO
A relaunch creates risk because search engines and visitors are both expecting continuity. If the live site changes faster than your signals do, you get drift. That drift usually appears as 404s, redirect gaps, canonical mismatches, mixed-content errors, or internal links that still point to staging or retired paths.
| Failure mode | What to verify | What to do next |
|---|---|---|
| URL changes without redirects | Old high-value paths resolve to the intended live destination | Build or fix the redirect map before cutover |
| Canonical or metadata drift | Canonicals, titles, and robots directives match the live URLs | Correct templates or SEO settings on staging |
| Broken forms or integrations | Submissions arrive in the right inbox, CRM, or webhook log | Retest end to end, then confirm receiving-side evidence |
| Asset and cache regressions | CSS, JS, images, and fonts load correctly on key templates | Fix asset paths and purge stale cache before launch |
The baseline idea is simple: the site can change, but discoverability and core behavior should stay predictable. If you want more context on how this site approaches controlled launches and cleanup work, the about page explains that operating style.
Related implementation details are also covered in WordPress documentation, which helps keep tool decisions grounded in established practices.
1. Pre-work: inventory and access before you touch backups
Start here. Do not begin with a plugin update spree or a DNS change. Begin with inventory.
- What to verify: List the domain, subdomains, hosting accounts, staging URLs, database access, file storage, email routing, analytics properties, tag manager containers, and search console properties.
- What can fail: Teams often discover too late that one credential lives in an old mailbox or that only one person can change DNS.
- What to do next: Confirm access for staging, production, DNS, SSL, and WordPress admin before any migration step begins.
Also document the current URL structure. Capture the home page, blog index, service pages, category or listing templates, post templates, and the contact path. On a WordPress site, this prevents template-level surprises when a single setting changes multiple page types at once.
2. Backups and rollback plan: make recovery real
Backups that cannot restore are just decoration. A safe rollback plan names the trigger, the data set, the restore path, and the verification steps.
- What to save: Database dump, uploads and media, active theme files, plugin configuration, environment variables, rewrite rules, and any custom snippets that affect routing or forms.
- What can fail: A backup may exist, but it may exclude uploads, miss environment configuration, or restore into a broken staging copy that no one tested.
- What to do next: Restore the backup to staging, then run a short verification suite against key URLs, forms, robots.txt, sitemap.xml, asset loading, and admin login.
Define rollback triggers in advance. Good triggers include failed redirects on high-value URLs, indexing anomalies, broken contact flows, or a measurable performance regression on core templates. Store at least one known-good restore point outside the main hosting account with restricted access.
Rollback checklist
- Record the current production state: theme version, plugin list, key options, and server or DNS settings that may change.
- Create a full backup set and store it in a separate location.
- Restore that backup to staging.
- Test a representative set of pages and one end-to-end form flow.
- Write down the exact steps to revert traffic or code if launch checks fail.
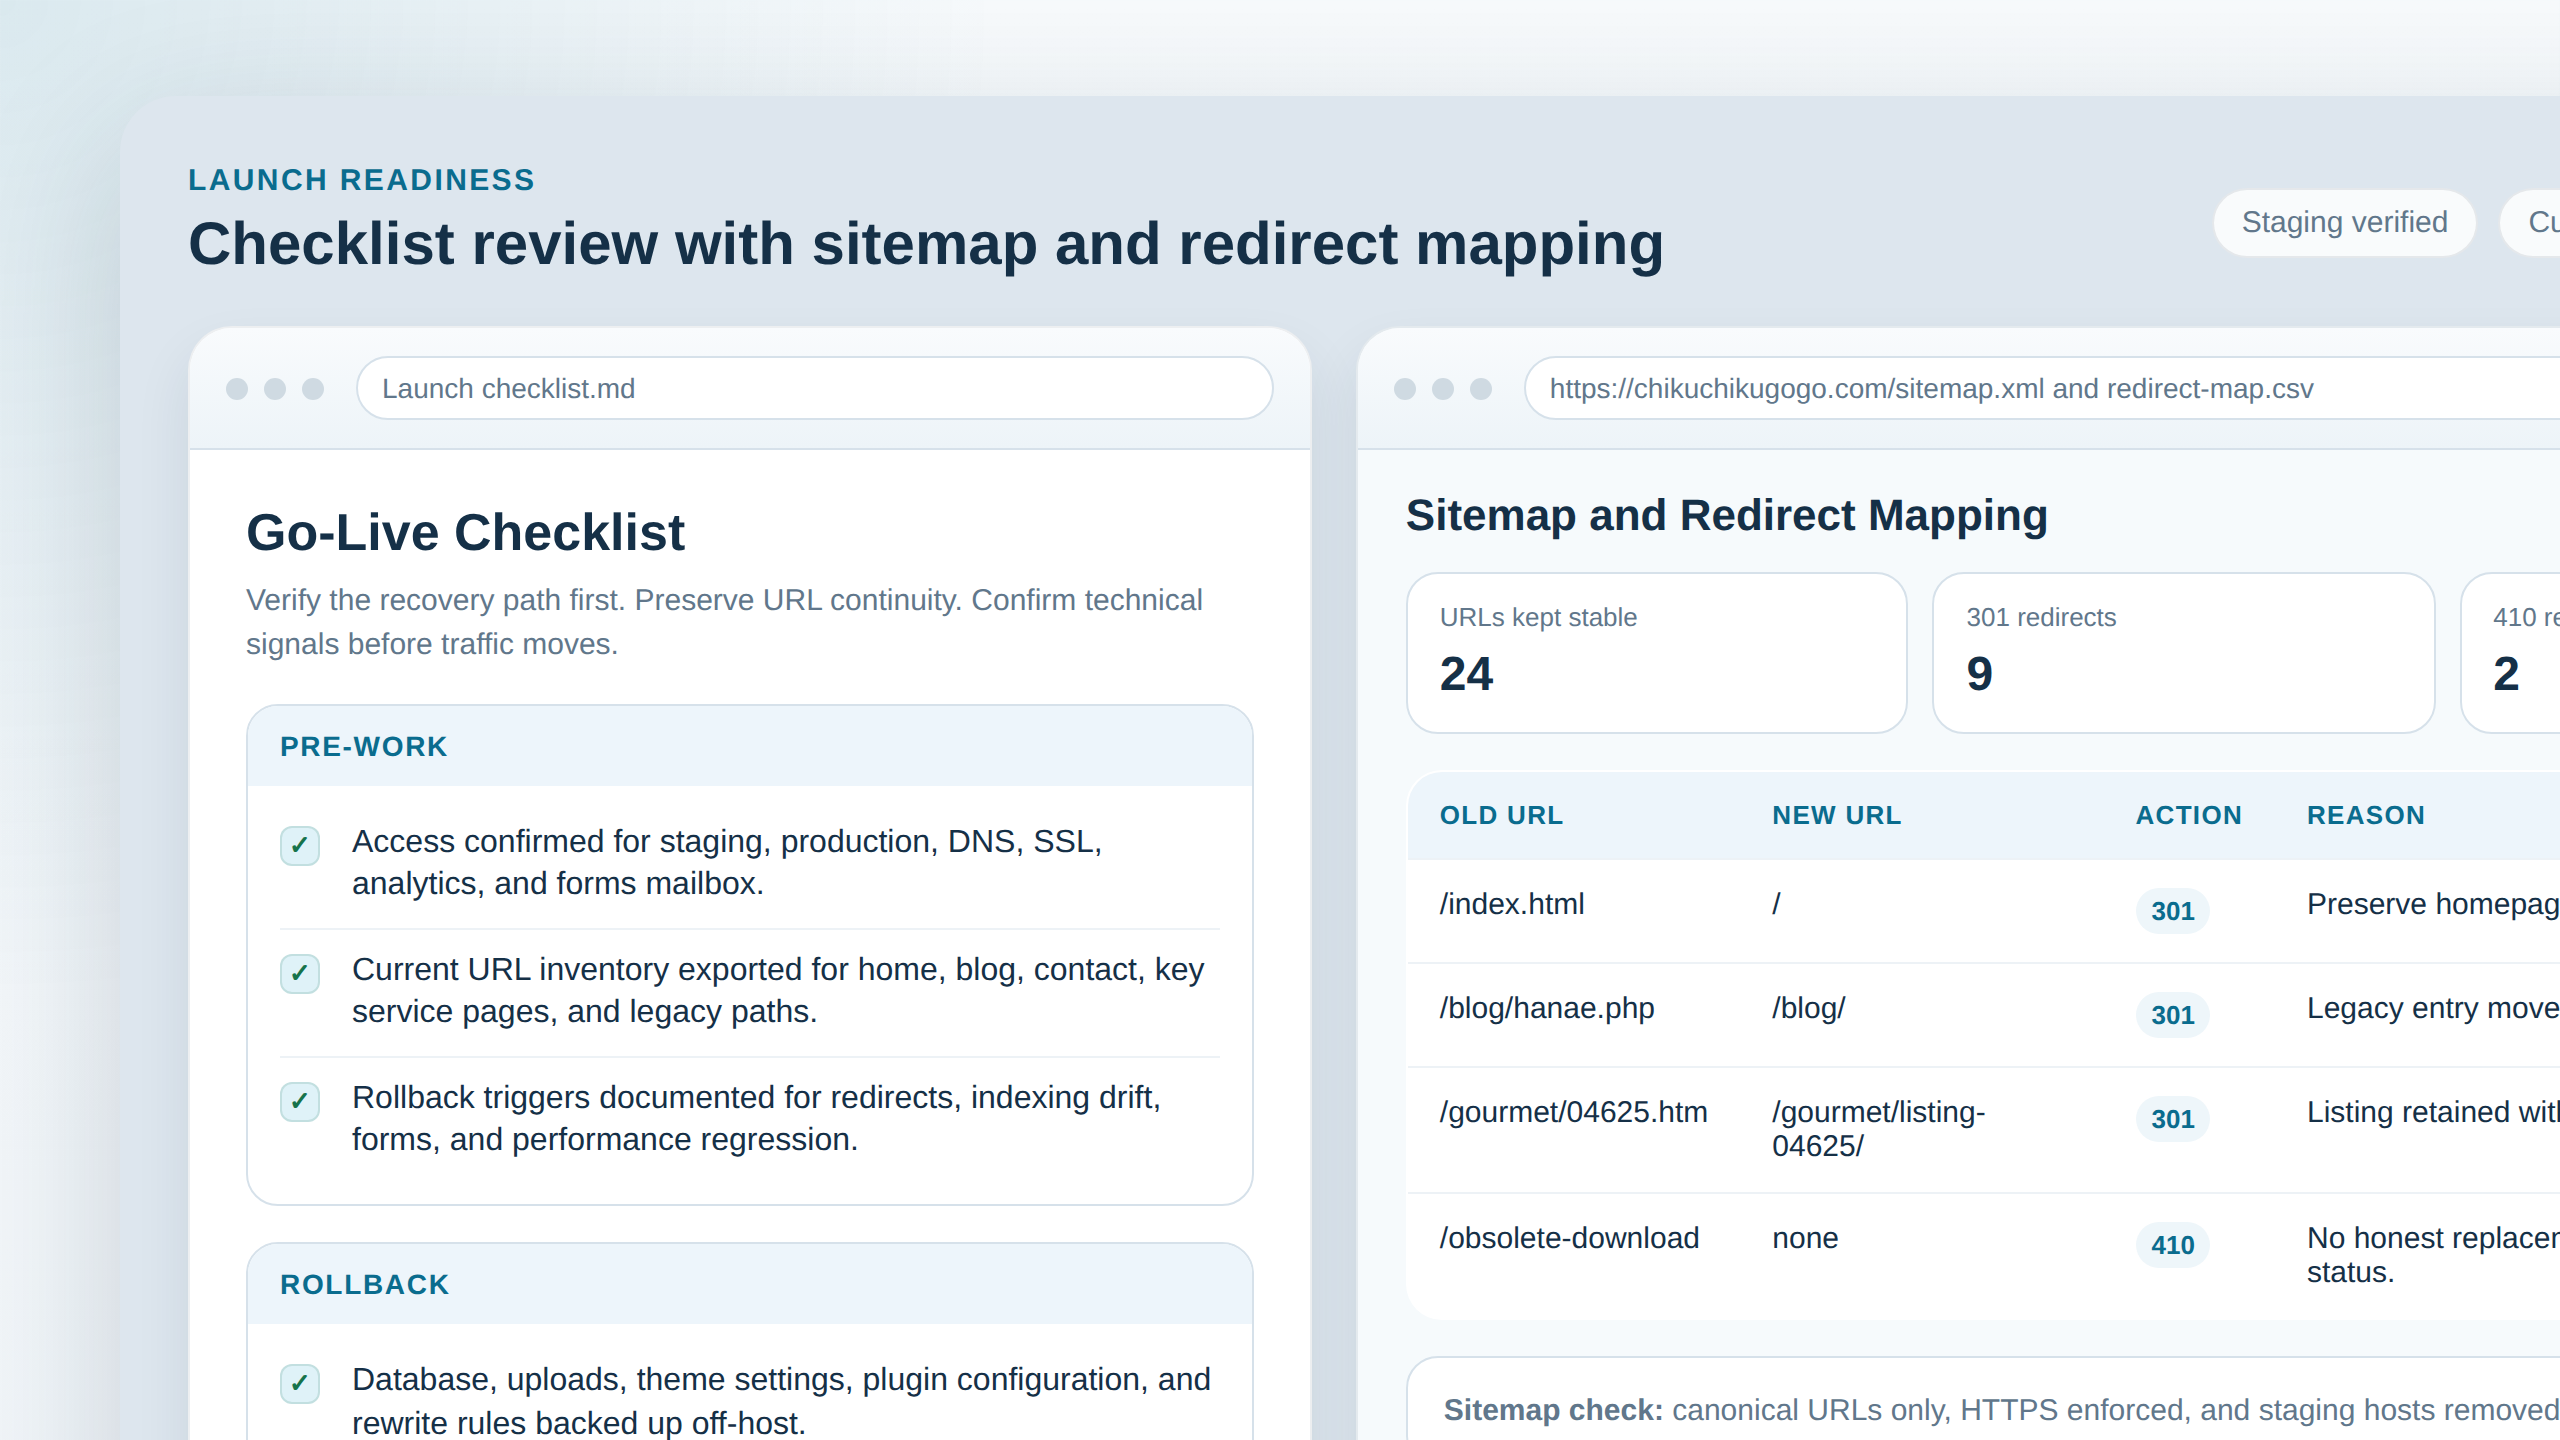
3. URL and content mapping: the SEO-critical step
This is the section that protects search visibility. Keep slugs stable where possible. If a page must move, map it intentionally.
- What to verify: Every meaningful old URL has a documented destination, status, and reason.
- What can fail: Pages get merged without a redirect plan, internal links keep pointing at pre-launch paths, and canonical tags still reference the wrong destination.
- What to do next: Build a mapping table before launch, then verify the results with live URL tests on staging.
Your mapping table should look like this:
| Old URL | New URL | Redirect type | Reason |
|---|---|---|---|
| /old-service-page | /service-page | 301 | Slug normalized, content still exists |
| /old-blog-path/example | /blog/example/ | 301 | Post kept, permalink structure updated |
| /retired-campaign | /contact/ | 301 | Closest relevant live destination |
| /obsolete-download | none | 410 | Content intentionally removed with no equivalent replacement |
Use a 301 when a new page meaningfully replaces the old one. Use a 410 when the content is intentionally gone and there is no honest equivalent. Redirecting every dead page to the home page may look tidy, but it usually confuses both users and crawlers. After the map is set, update navigation and internal links to final URLs rather than relying on redirects to clean up your own menu errors.
4. Theme and plugin sanity check: reduce moving parts
Launches become fragile when teams change the theme, three plugins, the permalink structure, and the cache layer in the same window.
- What to verify: WordPress core settings, active theme behavior, critical plugins, permalinks, timezone, and any custom rewrites all behave as expected on staging.
- What can fail: A minor plugin update changes markup, breaks form handling, or fights with a caching or SEO plugin.
- What to do next: Keep the delta small. Update only what the relaunch actually needs, then test conflicts on staging before launch day.
Check caching layers, CDN behavior if used, and any redirect, security, or SEO plugin that can alter headers or output. The safe rule is to change fewer systems at once. Debugging one failure mode is manageable. Debugging five at once is how launch windows get extended for avoidable reasons.
5. Core technical checks: indexing, metadata, and crawl signals
These are the non-negotiables. If one of them is wrong, a site can look healthy in the browser while still sending bad signals to search engines.
- robots.txt: Verify it allows crawling of important public paths and does not accidentally block the live site.
- sitemap.xml: Verify it exists, loads, and lists the canonical live URLs you actually want indexed.
- Canonical tags: Verify they point to the final production URLs, not staging, alternate domains, or redirected paths.
- HTTPS: Verify HTTP resolves to HTTPS, mixed content is gone, and certificates are valid.
- Cookies and sessions: Verify login, protected areas, carts if present, and form/session flows behave correctly after the domain switch.
- 404 behavior: Verify missing pages return real 404 or 410 responses instead of soft-404 content with a 200 status.
Failure mode: the site launches with “discourage search engines” still enabled, canonicals pointing at staging, or a sitemap full of redirecting URLs. What to do next: stop the cutover, correct the configuration, and test the public-facing responses again before sending traffic.
6. Forms and integrations: test end to end, not just the interface
This is where the quiet failures live. A form can render perfectly and still route nowhere.
- What to verify: Contact forms, quote requests, email delivery, spam protection, analytics events, CRM or webhook routing, and any payment or gated flow that depends on credentials or environment variables.
- What can fail: Form success messages appear while email fails, spam filtering blocks all submissions, or analytics events stop firing after consent or domain changes.
- What to do next: Submit from a real browser session, then verify on the receiving side: inbox, CRM record, webhook log, analytics event stream, or order record.
Do not settle for “the button worked.” You need evidence that the submission arrived where it should. If you need help reviewing those launch details or cleaning up redirect logic before cutover, the contact page is the right next step.
7. Performance and assets: protect crawl efficiency and user trust
Performance regressions rarely look dramatic in the editor, but they show up quickly in mobile use and crawl efficiency.
- What to verify: Image formats and sizes, descriptive alt text, CSS and JS delivery, font loading, lazy-load behavior, cache headers, and key template performance on mobile.
- What can fail: Oversized images slow the page, lazy-load hides important above-the-fold content, or stale caches serve broken HTML after launch.
- What to do next: Test the home page, a blog post, and the contact page on staging before launch, then repeat after cutover once cache and DNS settle.
Pay extra attention to asset paths. Theme moves, CDN rewrites, or environment-specific URLs can leave you with missing stylesheets, broken images, or JavaScript that loads only on one environment. That kind of regression damages trust fast.
8. Accessibility and usability basics: quick checks that prevent churn
Accessibility checks do not need to become a separate project to be useful before launch. A short pass catches common issues and reduces support load after the site goes live.
- What to verify: Mobile layout, responsive navigation, keyboard focus states, readable contrast, form labels, and clear error messages.
- What can fail: Theme changes remove visible focus, the mobile menu traps users, or a form reports an error without explaining how to fix it.
- What to do next: Test a few critical journeys on a phone and with keyboard-only navigation before launch, then fix the obvious blockers first.
These are practical reliability checks, not decoration. A site that launches with broken mobile navigation or unreadable contrast will create support work immediately, even if the redirect map is perfect.
9. Final launch flow: the minimum safe order
- Complete the inventory and access check.
- Create and test the backup and rollback path.
- Finish the URL mapping table and redirect implementation.
- Validate theme, plugin, and permalink behavior on staging.
- Verify robots.txt, sitemap.xml, canonical tags, HTTPS, and crawl signals.
- Run end-to-end tests for forms, analytics, and integrations.
- Check performance, assets, mobile layout, and keyboard usability.
- Cut over traffic only after the verification list passes.
Conclusion
A safe website relaunch is not one big moment. It is a controlled sequence: inventory first, recovery path second, URL mapping third, then technical SEO and functional verification before traffic changes. That order protects both visitors and search visibility.
Keep these points in view:
- Rollback comes before risk. Save what matters, test the restore, and define the trigger.
- URL mapping protects SEO. Keep slugs when possible, redirect intentionally when not, and use 410 only when a page is truly gone.
- Technical SEO is a baseline check. Robots, sitemaps, canonicals, HTTPS, and status codes should be verified, not assumed.
- Forms need receiving-side proof. A success message is not delivery.
- Performance and usability still matter. Images, caching, lazy-load, mobile layout, and keyboard access affect trust immediately.
If you are planning a relaunch and want more step-by-step operational guidance, start from the home page, browse the blog, read more about the site’s process on the about page, or use the contact page before making a risky change.
Teams planning a rebuild can use Flatlogic's custom web development services as a reference for scoping pages, forms, dashboards, and launch handoffs before development starts.